Saturday, October 31, 2009

How to Clean the Garden

Put the chickens to work.
They've been having a great time turning over the soil for me,
scratching, eating bugs and fertilizing.

Busy, happy girls found lots of worms and never stopped clucking.

All of the babies are now laying eggs and today we found 6 eggs in the nesting box.

Chipmunk our Easter Egger has stopped laying to molt.

She looks ridiculous but still a good garden worker.
Or you can just make the five year old clean the garden.
Happy Halloween!

Wednesday, October 28, 2009

This Week in Homeschool

We've had a very busy week. I didn't get to post the letters Aa or Bb that we completed.
I'll do that another time.

Tae was completely thrilled when he finished his Kindergarten Math Readiness Book. I'm amazed at how easy math comes to him. He's already adding and subtracting.
And at the end of the book it had a really cool certificate of completion.

Stewie, my husband's totally fabulous Hearing Dog lounges in the hallway.

Morgan did her McGraw-Hill Science on the couch.

Here is Tae doing some adding and subtracting.
He learned so much just by using counting bears.

We carved some pumpkins this week.
Patrick's is a little macabre with the knife sticking out of it.

He hated scooping the seeds out.
The insides of the pumpkin made him gag.

Morgan dove right in.

Tae made rude comments about the "guts" as he calls them.

Our homeschool group met this week and painted some watercolor leaves to honor the beautiful Autumn season.

Shane made some beautiful leaves.

The kids had their own ideas of what the leaves should look like.

We sprayed the leaves with water to help the color wick through the paper.
The kids loved using the spray bottle.

Even the moms made some colorful creations.
It was a great week!

Wednesday, October 21, 2009

Fall Chickens

Our baby chickens that came at the end of May are all grown up.
They are so fun to watch and a great homeschool project for the kids.
They all helped with the coop construction, cared for the babies and helped raise them.

Patrick loves the chickens.

Yes, that's a chicken in his lap. Her name is Chipmunk. She's a terrible layer often laying soft shelled eggs. Even increasing her calcium has never helped. When she does lay a good egg it is a beautiful blue-green color. We should get rid of her for her poor laying but really she's the most friendly chicken ever. A lap chicken.

Surrounded by chickens my son is very happy.

That's Chipmunk sleeping on his lap.

And I had to post these because our house is covered in Ladybugs or the Asian Beetles. It's gross. You walk outside and they fall in your hair and if you kill them they stink and leave big stains on your walls. Can't stand this time of year for the bugs. Ewww.

This is Sugar-I call her Blanca. All of our chickens seem to have two names. She was our first baby to lay an egg at 21 weeks. They are the tiniest eggs but will get bigger overtime. We all watched her lay her egg while freeranging. I thought she was sick because she was acting funny. All of the sudden she laid two eggs right in a row.
Her first egg had no shell and the dog thought it was a great treat. The second egg only had the membrane so we gave that to the dog too. The poor chicken was so confused as to what to do. She felt much better after her eggs were laid.

This is Butter. I call her Butter. She only has one name. She is our Beautiful Buff Orpington.
When you pet her she squats down-a sure sign that egg laying will come soon.

Here is our older Buff Orpington named Rosie. She is moulting and looks ridiculous.
Her feathers are missing and she's cranky.

We ordered all hens from My Pet Chicken. We got 3 Roosters. One we gave away and two we kept. This is Paprika. Patrick calls him Phoenix. He's a stunningly gorgeous Easter Egger Rooster. He has gold hackle feathers and fabulous cheek puffs. We hope to breed him.

See? Gorgeous. His neck feathers are blue and the rest of him is well, Paprika colored.

He's a very good Rooster and keeps watch over the girls. He's very friendly too and by that I mean he doesn't attack me. We had a white silkie rooster that attacked everyone.
He's now living on a farm with a flock of 40 girls. In the back of the Roo you can see our two Cuckoo Marans (gee did we ever name them?) that will lay chocolate colored eggs, we have a Dominique (named Dominique), a Silver laced Wyandotte (named Raisin) and two Black Australorps that we call Panini and Licorice. Only ten layers and two Roosters.
Those poor girls are already sick of the Roos.
Our other Rooster is named Ruby. We thought this was a hen for a long time as this bird was very slow to develop anything that looked like a Rooster. He was already named Ruby when we discovered he was of the male gender so now we tell everyone that it's short for Ruben.
Ruby is also a stunning Easter Egger Rooster.

He has gorgeous iridescent green tail feathers layered with many, many colors. We also hope that he breeds with some of the girls.

See his tail feathers and coloring? He's beautiful.
It's been a great learning experience for all of us. And the fresh eggs are delicious and nutricious for our family. Can't wait until the other babes start laying.


Monday, October 19, 2009

Preserving Apples-A Tutorial

Some of you have asked how I have preserved or jarred the 70 plus pounds of apples we picked at Jaswell farms. It's not a hard process at all.
Just about any kind of apples can be used. I like the sweeter ones but tart ones work just as well if you like them and sugar can be adjusted.

Start with canning jars. These are pint size but I've also done quart size. My family can polish off a quart of applesauce at one sitting. You need the jars with screw lids and rubber seal inserts.

You also need a really big pot for the water bath and helping to seal the jars when full.

Fill the pot with enough water to cover the tops of the jars.

Throw all the jars with lids and tops into the boiling water for 20 minutes.
If you don't want to take this step you can simply run everything
through the diswasher on the sterilize cycle.
While the jars are sterilizing you can prepare your apples.
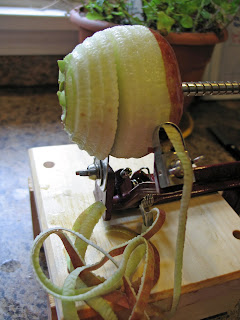
My neighbor Mary lent me this apple corer. I need to get one.

Spear the apple on the rod, push it toward the blade and crank the handle.

See how nicely it peels, cores and spiral cuts the apple?
Each apple only takes about 20 seconds to peel. A total time saver.

It's a beautiful thing.

Spiral cut and cored to perfection.

The little piece of apple with peel that is left is given to the kids for a snack or to the chickens. The chickens are quite fond of apples.

See-just pop off the core and discard....to the chickens or compost pile.

Cut the apples in half and throw them into a big pot to cook.

Add granulated sugar, brown sugar, cinnamon and I like a bit of cloves and orange peel/rind in mine. I wish I could give you amounts but really it all depends on your taste. For the 20 pounds of apples I peeled, I used about 1/2 cup each of brown and granulated sugar and about 2 tablespoons of cinnamon, pinch of orange peel and cloves. If the apples are juicy you won't need to add extra water. If they are on the drier side then add a few tablespoons of water.
That's how my measuring goes.

Time to check on the lids and jars.

After 20 minutes of being in a boiling water bath, pull them out. I bought these handy tongs specifically for pulling out jars. I don't know how I lived without them.

When everything is pulled out of the water bath, place them on a clean towel. Keep the lids and jars facing up so that you don't contaminate the jars.

Cook the apples until they are fork tender. I like big chunks in mine and just a little bite left to them. You can puree' these if you choose but I like the chunky style.
You will need a big mouth funnel too. Don't try to do without one. It makes a mess.
Yes, I did try it with out a funnel. I was scraping syrup off my counters for days.

Ladle or spoon the applesauce into the jars.

Pack it in slightly. When full, wipe the top edge of the jar with a clean cloth to remove any syrup.
You don't want your lids sticking when it comes time to eat the applesauce. Sugar around the edge of the jar can also harbor and breed bacteria.

This tool has a magnet on one end for retrieving the lids from the boiling water bath. The other end is used to poke down the contents of the jar. You want to make sure that you poke and get out all of the air bubbles from the jars.
Airbubbles are bad and harbor bacteria. Leave about a 1/8 inch space at the top of the jar to allow for expansion. Put the lids on but not completely tight and return the jars to the water bath (with fresh boiling water). The water should just cover the tops of the jars. Let the water boil for 15 minutes with the jars in the pot.
The jars will make quite a racket as they clang together.
After 15 minutes take out the jars and screw the lids on tightly. Press down on the middle of the lid. If it pops back up then you need to water bath them longer.

Once the lids are screwed on tight, I turn them upside down on a clean towel to help keep the heat in and further seal the lids. Let these cool completely before storing. I keep mine in the extra refrigerator but it does just as well on a dry shelf. Don't forget to date the jars. They will keep up to a year under the right conditions.
If you have and extra juicy applesauce, try heating it on a stove for a few minutes and pour the mixture over vanilla icecream for a yummy treat.
It's also great mixed into some oatmeal.
This is a site I go to frequently to help with my jarring times.
Enjoy!